Interior Explore
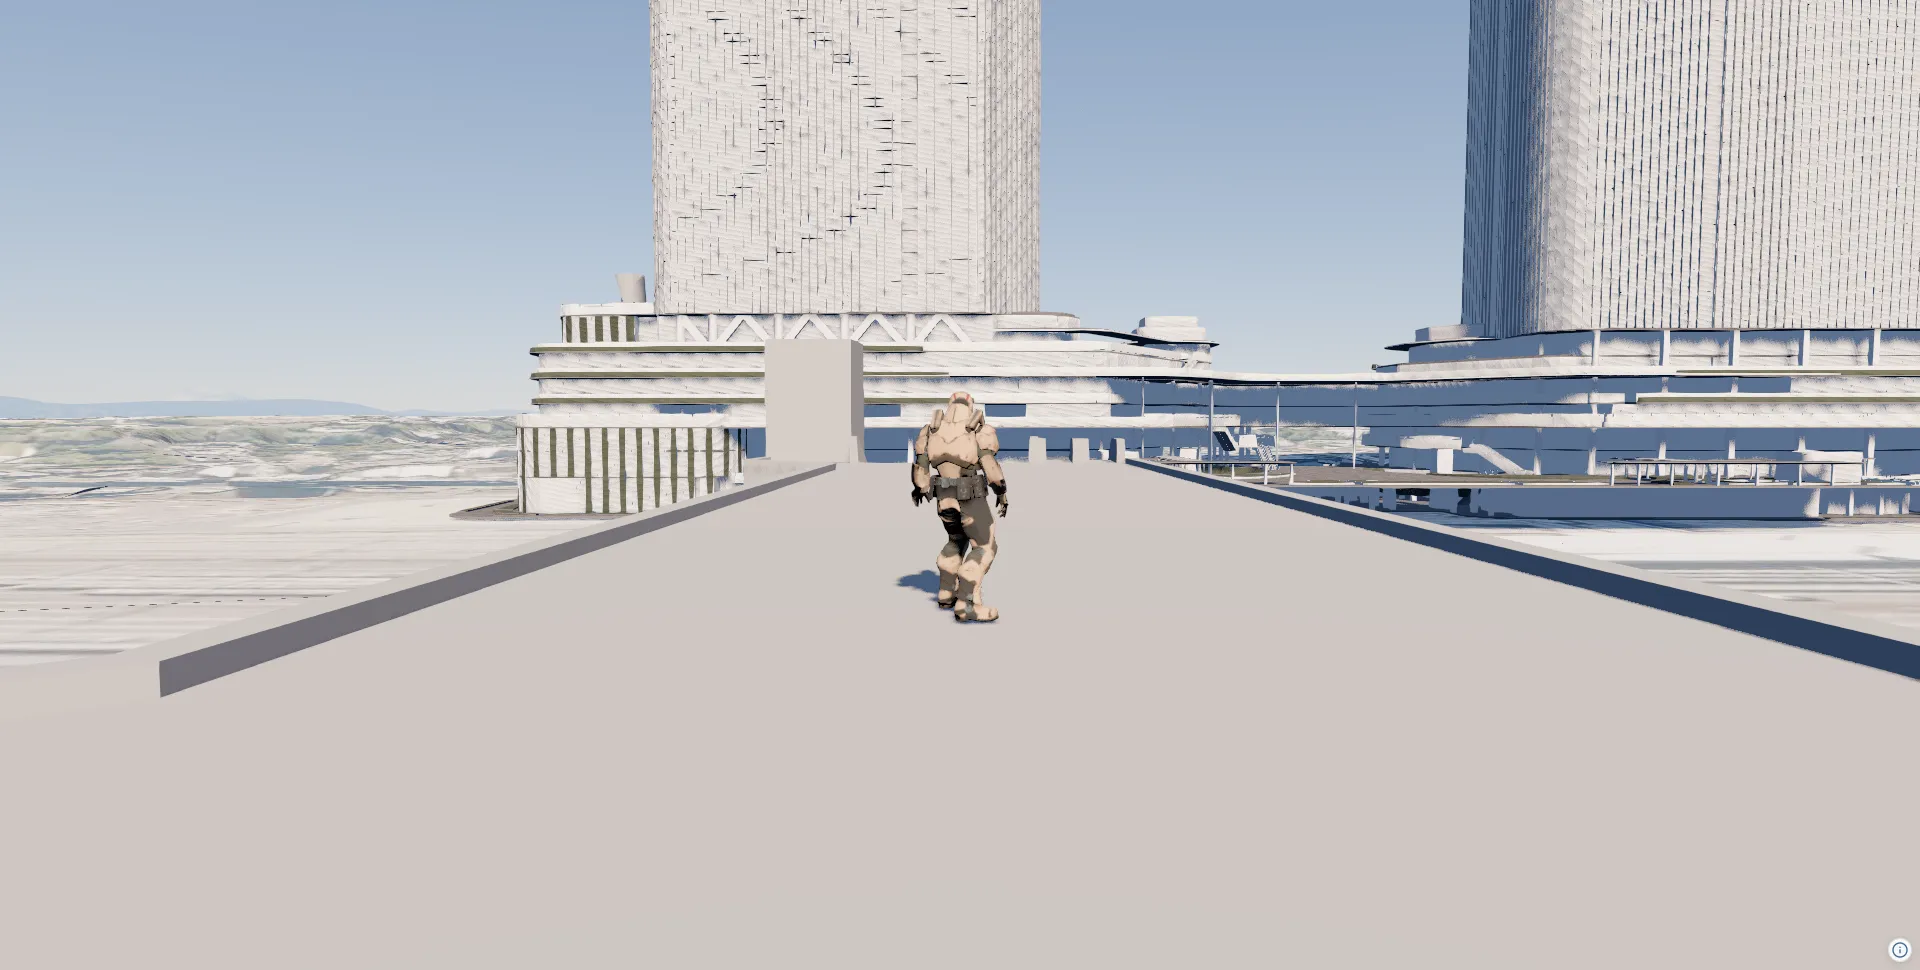
@navaramap/three-plugins の PersonViewPlugin を使って、3D Tiles の建物内をキャラクター操作で探索するアプリケーション開発を学びます。キャラクター操作処理をプラグインを使用することで簡単に実装できます。
このチュートリアルで学べること:
- 3D Tiles 建物モデルを読み込む
PersonViewPluginで GLTF キャラクターを操作する- 地下や建物内をキャラクターに歩かせる
- 三人称視点と一人称視点を切り替える
- シーン変更時にキャラクターをテレポートさせる
基本シーンをセットアップする
Section titled “基本シーンをセットアップする”影は ThreeView の構築時に有効化する必要があります。shadow はコンストラクタで一度だけ読まれ、後から有効にはできません。
import ThreeView, { Color } from "@navaramap/three";import {  DefaultPlugin,  type DefaultDescriptions,} from "@navaramap/three-default-plugin";import { PersonViewPlugin } from "@navaramap/three-plugins";
const plugin = new DefaultPlugin();const view = new ThreeView<DefaultDescriptions>({  shadow: true,  backgroundColor: new Color().setStyle("#475668"),});view.addPlugin(plugin);
PersonViewPlugin も他のプラグインと同様、view.init() の前に登録します。
PersonViewPlugin を追加する
Section titled “PersonViewPlugin を追加する”プラグインがキャラクター(モデル・アニメーション・移動)とカメラを自動的に扱います。minAlt を負の値にすると地下にも降りられます。建物内に収まるよう、cameraDistance は小さめに設定します。
const startLat = 35.6341630282;const startLng = 139.7420527162;const startHeight = 59.05;const startHeading = 288;
const personView = new PersonViewPlugin({  character: {    modelUrl: "/Soldier.glb",    animation: {      idleClip: "Idle",      walkClip: "Walk",      dashClip: "Run",      speed: 1.0,      crossfadeDuration: 0.3,    },    modelRotationOffset: { x: Math.PI / 2, y: 0, z: 0 },    modelScale: 1,    castShadow: true,    receiveShadow: true,  },  moveSpeed: 5,  altSpeed: 5,  rotationSpeed: 2,  cameraDistance: 8,  cameraPitch: 3.4,  cameraLerpSpeed: 4,  minAlt: -1000,  maxAlt: 5000,  startLat,  startLng,  startHeight,  startHeading,  allowCameraControl: true,});
view.addPlugin(personView);await view.init();
view.atmosphere.date.setHours(8);view.toneMappingExposure = 10;
const layers = plugin.addDefaultPhotorealScene();layers.sun.update({  sun: { castShadow: true, shadowFar: 1000, shadowLambda: 1 },});
sun.shadowFar の既定値は 50km で、シャドウカスケードが広がりすぎて人物サイズの影は解像されません。shadowFarをキャラクターが歩く範囲まで寄せると、キャラクターの影が見えるようになります。
地形と地図タイルを追加する
Section titled “地形と地図タイルを追加する”探索エリアの地形と衛星写真タイルを追加します。建物の地下部分を可視化するため、地形のスカートは無効化しておきます。
const terrainSource = view.addSource({  type: "quantized-mesh",  url: "https://terrain.reearth.land/cesium-mesh/ellipsoid/{z}/{x}/{y}.terrain",  requestVertexNormals: true,  maxZoom: 18,});view.addLayer({  type: "terrain",  source: terrainSource,  terrain: {    castShadow: true,    receiveShadow: true,    skirt: false,  },});
const photoSource = view.addSource({  type: "raster-tile",  // Credit:  // - Geospatial Information Authority of Japan Tiles - Latest Nationwide Photo (Seamless)  //   https://maps.gsi.go.jp/development/ichiran.html  url: "https://cyberjapandata.gsi.go.jp/xyz/seamlessphoto/{z}/{x}/{y}.jpg",  maxZoom: 18,});view.addLayer({  type: "raster",  source: photoSource,});
3D Tiles 建物モデルを読み込む
Section titled “3D Tiles 建物モデルを読み込む”PLATEAU などの Cesium 3D Tiles 建物モデルを読み込みます。室内の空気感を表現するため、影の設定を有効化しておきます。
const buildingSource = view.addSource({ type: "3d-tiles", // Credit: // - [UC23-11] Advanced Area Management Using Storytelling GIS - MLIT PLATEAU // https://www.geospatial.jp/ckan/dataset/plateau-uc23-11 url: "https://assets.cms.plateau.reearth.io/assets/c1/28f9ff-e9d0-44df-b092-88ac7ebdfa42/tngw_4gaiku/tileset.json",});view.addLayer({ type: "3d-tiles", source: buildingSource, model: { show: true, castShadow: true, receiveShadow: true, },});プラグインを開始する
Section titled “プラグインを開始する”これで GLTF モデルがロードされ、キャラクターとカメラを駆動する毎フレームの更新ループが走り始めます。
personView.start();これだけでキーボード入力が効くようになり、カメラもキャラクターを追従します。
デフォルトのキー割り当て
| キー | アクション |
|---|---|
| W / S | 前進 / 後退 |
| A / D | 左旋回 / 右旋回 |
| Arrow Up / Space | 上昇 |
| Arrow Down / Ctrl | 下降 |
| Shift | ダッシュ(dashClip に切り替わる) |
| Alt(押下中) | カメラのオービット操作 |
| V | 三人称 / 一人称の切り替え |
デフォルトの追従カメラ(TPV)は三人称です。V キーで一人称(FPV)に切り替えると、キャラクターのモデルは自動的に非表示になります。Alt を押している間はカメラを手動操作できますが、注視点はキャラクターのままです。
動きを受け取る
Section titled “動きを受け取る”プラグインは毎フレーム、現在の緯度・経度・高度・方位・速度・視点モードを通知します。HUD やミニマップなどの UI を駆動するときは onStateChange() を購読してください。
const unsubscribe = personView.onStateChange((state) => {  console.log(state.lat, state.lng, state.alt, state.heading, state.mode);});
// 後で購読解除するunsubscribe();
シーン間でテレポートする
Section titled “シーン間でテレポートする”teleport({ lng, lat, alt, heading? }) を使うと、メニューから別の建物を選んだ時などにキャラクターを瞬時に移動させられます。その場で向きだけを変えるには setHeading() を、カメラのピッチを調整するには setCameraPitch() / setFpvPitch() を使用します。
personView.teleport({ lng: 139.7397, lat: 35.6352, alt: 84 });追従カメラも新しい位置にスナップし、状態リスナーが新しい位置で 1 回発火します。
入力・キャラクター・アニメーション・カメラをすべてプラグインが担うため、アプリ側のコードは短く保てます。
import ThreeView, { Color } from "@navaramap/three";import {  DefaultPlugin,  type DefaultDescriptions,} from "@navaramap/three-default-plugin";import { PersonViewPlugin } from "@navaramap/three-plugins";
const plugin = new DefaultPlugin();const view = new ThreeView<DefaultDescriptions>({  shadow: true,  backgroundColor: new Color().setStyle("#475668"),});
const startLat = 35.6341630282;const startLng = 139.7420527162;const startHeight = 59.05;const startHeading = 288;
const personView = new PersonViewPlugin({  character: {    modelUrl: "/Soldier.glb",    animation: {      idleClip: "Idle",      walkClip: "Walk",      dashClip: "Run",      speed: 1.0,      crossfadeDuration: 0.3,    },    modelRotationOffset: { x: Math.PI / 2, y: 0, z: 0 },    modelScale: 1,    castShadow: true,    receiveShadow: true,  },  moveSpeed: 5,  altSpeed: 5,  rotationSpeed: 2,  cameraDistance: 8,  cameraPitch: 3.4,  cameraLerpSpeed: 4,  minAlt: -1000,  maxAlt: 5000,  startLat,  startLng,  startHeight,  startHeading,  allowCameraControl: true,});
view.addPlugin(plugin);view.addPlugin(personView);await view.init();
view.atmosphere.date.setHours(8);view.toneMappingExposure = 10;
const layers = plugin.addDefaultPhotorealScene();layers.sun.update({  sun: { castShadow: true, shadowFar: 1000, shadowLambda: 1 },});
const terrainSource = view.addSource({  type: "quantized-mesh",  url: "https://terrain.reearth.land/cesium-mesh/ellipsoid/{z}/{x}/{y}.terrain",  requestVertexNormals: true,  maxZoom: 18,});view.addLayer({  type: "terrain",  source: terrainSource,  terrain: {    castShadow: true,    receiveShadow: true,    skirt: false,  },});
const photoSource = view.addSource({  type: "raster-tile",  // Credit:  // - Geospatial Information Authority of Japan Tiles - Latest Nationwide Photo (Seamless)  //   https://maps.gsi.go.jp/development/ichiran.html  url: "https://cyberjapandata.gsi.go.jp/xyz/seamlessphoto/{z}/{x}/{y}.jpg",  maxZoom: 18,});view.addLayer({  type: "raster",  source: photoSource,});
const buildingSource = view.addSource({  type: "3d-tiles",  // Credit:  // - [UC23-11] Advanced Area Management Using Storytelling GIS - MLIT PLATEAU  //   https://www.geospatial.jp/ckan/dataset/plateau-uc23-11  url: "https://assets.cms.plateau.reearth.io/assets/c1/28f9ff-e9d0-44df-b092-88ac7ebdfa42/tngw_4gaiku/tileset.json",});view.addLayer({  type: "3d-tiles",  source: buildingSource,  model: {    show: true,    castShadow: true,    receiveShadow: true,  },});
personView.start();